Adding an aluminum storm window can improve weather protection, but installation succeeds only when the existing window and the new assembly can drain correctly.
For project managers, blocked drainage means more than damp sills. It can lead to damaged finishes, concealed deterioration, warranty disputes, and expensive repeat visits.
Before approving installation, identify existing weep holes, inspect sill conditions, and confirm fastening and sealant locations against the instructions for both window assemblies involved.
This guide explains how to plan the retrofit, protect drainage paths, coordinate installation responsibilities, and establish inspection checkpoints that reduce rework and protect the building envelope.
Identify Where Water Must Escape Before Approving the Retrofit
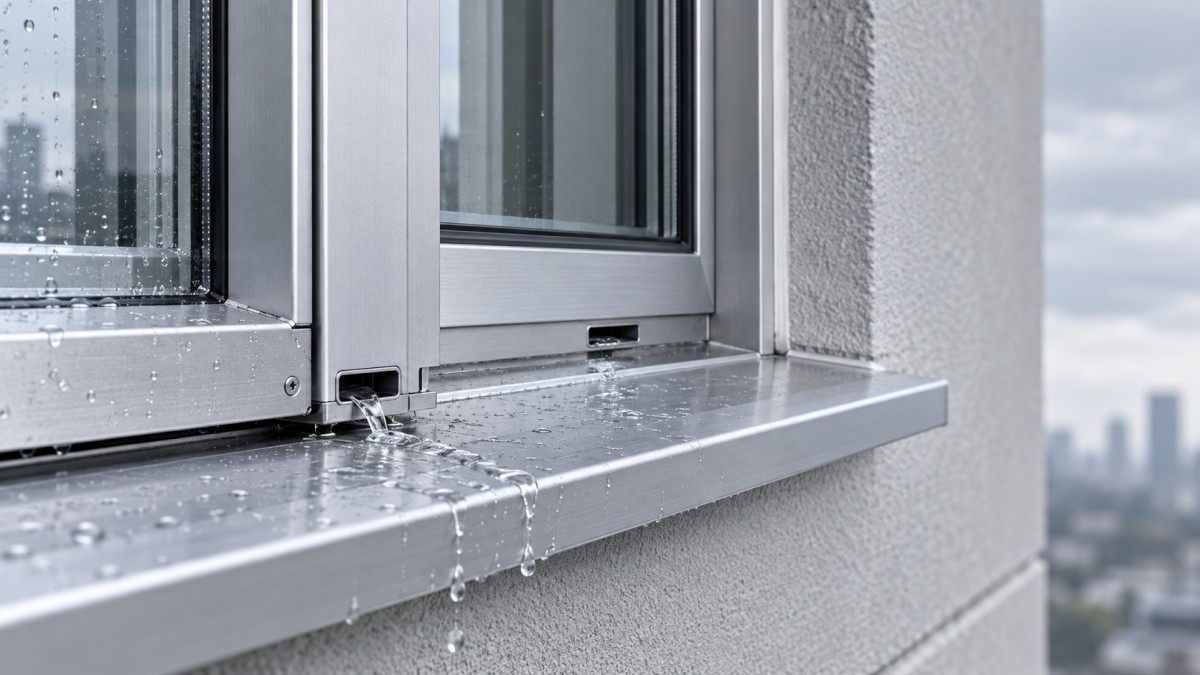
The central question is whether water entering the existing window system can still reach the exterior after the storm frame, fasteners, and sealant are installed.
Many windows include concealed drainage chambers that discharge through sill slots, frame openings, or dedicated outlets. Their locations vary with frame construction and operating style.
Do not assume that every visible opening is a drain, or that the drainage path ends where water first emerges from the original frame.
A storm window positioned outside those outlets can create another barrier. Water must pass beyond that barrier through an approved drainage route to the exterior.
Survey representative openings before ordering materials. Record sill slope, frame setbacks, outlet locations, substrate condition, and any differences between elevations or previous repair phases.
Photograph each outlet with a scale reference and mark its position on the installation detail. This makes drainage protection verifiable during fabrication and site supervision.
If paint, debris, or previous caulking conceals an outlet, investigate carefully. Confirm its function before removing material that may belong to the original weatherproofing system.
Where the drainage route remains uncertain, obtain drawings or technical guidance from the original window manufacturer, the storm window supplier, or a qualified building envelope specialist.
Decide Whether the Existing Opening Is Ready for Installation
A storm window should supplement a serviceable opening. It cannot reliably correct a deteriorated sill, failed flashing, or an existing leak with an unidentified source.
Inspect timber for softness, metal for corrosion, and masonry for cracking or loose material. Check whether the proposed fastening substrate can support the specified attachment.
Look for staining below sill corners and around interior finishes. These patterns can identify areas requiring investigation, although staining alone does not establish the leak source.
Verify that the sill directs water outward. A level or inward sloping surface may retain water even when the visible drainage openings remain unobstructed.
Separate existing defects from retrofit requirements in the scope of work. Assign responsibility for substrate repairs, drainage cleaning, flashing corrections, and any necessary design review.
For budgeting, compare the complete installed cost, including access, preparation, mockup work, inspections, and repairs. A low unit price can conceal substantial opening preparation costs.
Prioritize repairs where retained water could affect occupied rooms or vulnerable finishes. Hotel projects may also face room closures and disrupted operations during corrective work.
Approve installation only when the opening is suitable or a documented repair plan exists. Covering unresolved defects makes later diagnosis and remediation more difficult and costly.
Choose a Mounting Detail That Preserves Both Drainage Systems
An aluminum storm window introduces its own frame geometry and drainage requirements. Review how these interact with the existing sill before accepting the proposed mounting position.
Check whether the bottom rail overlaps original weep outlets, creates a raised dam, or discharges water onto a surface that cannot drain beyond the assembly.
The correct solution may involve a different mounting position, a manufacturer designed drainage feature, or another approved configuration suited to the existing opening geometry and exposure.
Do not create field cut slots, drill additional holes, or substitute spacers without approval. Such modifications can affect structural performance, weather resistance, finishes, and warranty coverage.
Specify measurable clearances using approved drawings. Avoid generic minimum gaps because required dimensions depend on the particular profiles, drainage outlets, exposure, and attachment arrangement selected.
Confirm that screens, operable panels, and removable components will not obstruct drainage during normal use. Evaluate the assembled product, including accessories, rather than the bare frame.
Access matters after handover. Drain outlets should remain inspectable and maintainable without destructive removal of trim or unreasonable disruption to building occupants and maintenance staff.
Also check emergency escape requirements, ventilation needs, and operating clearances where applicable. A workable drainage detail must remain compatible with the opening’s required building functions.
Make Sealant and Fastening Instructions Specific Enough to Inspect
Sealant should control unwanted water entry while preserving intended drainage. More sealant does not automatically provide better protection, particularly around the bottom of the frame.
Follow the storm window manufacturer’s installation instructions together with the existing window requirements. Resolve conflicting directions through an approved project detail before installation begins on site.
Some systems require selected bottom joints to remain open; others use defined weeps within a sealed assembly. Never apply one universal bottom sealing rule across products.
Show required sealant runs, intentional openings, and transitions on a drawing. Instructions such as “seal perimeter” are insufficient when the perimeter includes necessary drainage paths.
Select sealant compatible with aluminum finishes and adjacent substrates. Follow requirements for surface preparation, primers, joint dimensions, backing materials, application conditions, and curing before testing.
Keep sealant squeeze out clear of outlets and drainage chambers. A joint that looks neat from outside may still conceal an obstruction behind the frame.
Locate fasteners according to approved instructions, avoiding drainage passages and vulnerable frame areas. Unauthorized drilling can introduce leaks or interfere with concealed water management features.
Control tightening so the frame remains correctly aligned. Distortion can change panel operation, gasket contact, and drainage geometry even when the installation initially appears secure.
Use a Mockup to Resolve Problems Before Repeating Them
Install a representative mockup before releasing the full installation sequence. Select an opening that reflects typical conditions and include difficult variations where the survey identifies them.
The mockup should use the intended frame, accessories, fasteners, sealant, and substrate preparation. Simplified samples may miss the interactions that create drainage problems on site.
Arrange a joint review involving the installer, project supervisor, and relevant technical representative. Confirm mounting dimensions, outlet visibility, sealant placement, and access for future maintenance.
A controlled water application can help demonstrate drainage behavior when appropriate. Use a manufacturer accepted procedure, and allow required sealant curing before exposing new joints.
Observe where water travels, whether it exits as intended, and whether unintended pooling or interior wetting occurs. Check both the original outlets and storm frame discharge.
A hose demonstration does not establish a tested weather resistance rating. If contractual performance testing is required, specify an applicable procedure and qualified personnel separately.
Record the accepted arrangement with photographs and dimensions. Include concealed conditions captured before closure, because these may be impossible to verify during the final inspection.
Use the approved mockup as the installation reference. If later openings differ materially, review those variations instead of forcing every opening into the same detail.
Build Inspection Hold Points Into the Installation Sequence
Inspection is most effective before critical details disappear. Schedule checks around substrate preparation, frame positioning, sealing, and completion rather than relying solely on final appearance.
Before mounting, verify that required repairs are complete and identified outlets are clear. Compare the opening with the approved detail and record any material differences.
With the frame positioned, inspect overlap and clearance at the original drains. Confirm that water has a continuous route beyond the new assembly to the exterior.
Before sealant cures, check that installers have preserved specified drainage openings. Confirm fastener locations and look for frame distortion, displaced backing, or excess sealant material.
At completion, operate applicable panels and inspect accessible outlets. Remove installation debris and verify that trim, screens, or accessories have not altered the approved drainage arrangement.
Use a short checklist tied to observable conditions. “Drainage acceptable” provides less evidence than photographs showing clear outlets and the required discharge route through each assembly.
Define rejection criteria in advance, including covered outlets, unapproved modifications, incorrect sealing, or unresolved water retention. Assign responsibility for corrections and require verification before acceptance.
Track recurring defects by crew and opening type. Early patterns can reveal unclear instructions or unsuitable details before the same problem spreads across the project.
Keep Procurement Claims Separate From Window Performance Requirements
Procurement teams should request product specific drawings, installation instructions, applicable performance data, and warranty terms. General aluminum product descriptions cannot establish suitability for a storm window.
Aluminum Art describes a manufacturing business covering doors, courtyard gates, guardrails, stair handrails, and accessories. Its stated emphasis on quality and service supports supplier discussions.
For separate site access requirements, procurement teams may review Thickened aluminum alloy courtyard gate, electric sliding gate as part of a coordinated exterior works package.
The supplied LX-1048 information lists aluminum alloy construction, SOBINCO hardware, EPDM or silicone sealing options, and a stated warranty exceeding five years, subject to confirmation.
Because the listing combines gate, profile, and screen specifications, request a clarified configuration and applicable documentation before procurement. Confirm which specifications belong to the quoted assembly.
Those details should not be transferred to an aluminum storm window specification. Thermal performance, drainage design, hardware suitability, and warranty coverage require evidence for that product.
Where several exterior products share one supplier, coordinate finish schedules, delivery dates, technical support, and spare parts. Keep acceptance criteria specific to each installed system.
This approach preserves purchasing efficiencies while preventing unrelated marketing claims from becoming unintended project requirements. It also makes technical comparisons and warranty responsibilities easier to manage.
Approve the Upgrade When Drainage Is Demonstrated and Documented
The strongest approval decision rests on three conditions: the existing opening is serviceable, the selected mounting detail preserves drainage, and the completed installation matches that detail.
Include survey records, accepted drawings, mockup photographs, inspection results, and maintenance instructions in the handover package. These documents support troubleshooting and clarify responsibility if problems emerge.
Explain how maintenance staff should inspect and clean accessible outlets according to manufacturer guidance. Subsequent painting or recaulking must preserve every intentionally open drainage feature.
Plan inspection intervals around exposure, debris accumulation, and supplier recommendations. Check after significant weather events where appropriate, especially when the retrofit is newly installed on site.
Judge project value through reduced exposure, manageable maintenance, and fewer avoidable callbacks. Any expected energy savings should be assessed separately using information appropriate to the building.
A well planned aluminum storm window upgrade improves protection while allowing water to escape. Treat drainage as an acceptance requirement from the initial survey through final handover.